

Choosing the right types of wood joints will improve a woodworking project, making it more beautiful and last longer. New woodworkers feel overwhelmed by their lack of knowledge, and feel like they don’t have the right tools. It’s possible to make many of these joints using multiple methods, allowing beginners to learn them quickly. Now lets learn more about what types of woodworking joints are used and how to make them.
It can seem like there are an infinite number of woodworking joints available to the hobbyist. The truth is although you are limited to your own imagination, there are a group of basic joints to work with. These are either adapted, combined, or even used in non conventional manners.
For each of the types of joints I listed below I have a “Required tools” section. All of these tools are not necessarily required. Some have a couple options for the same process. For example, if there is a circular saw and a hand saw option, you can choose the one you own.
We are now going to look at some of the more popular types of woodworking joints. I am going to divide them into two categories: simple wood joints and complex wood joints.
Simple Wood Joints
#1 Butt Joint
The simplest joint to make is the butt joint. This one is used in places that are not as visible, and don’t have a lot of stress or weight put on it.
Required tools:
- Saw
- Hammer and nails or
- Screwdriver and screws
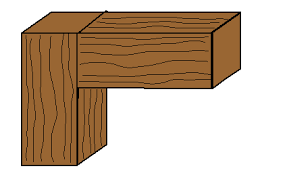
Butt joints are formed by butting one end of the lumber against the side of another piece. There are a few methods used to secure it. The easiest would be to drive a nail or screw through one piece into the other.
If you don’t want to see the screws, another option is to join it with dowels, forming a dowel joint. Use glue with this joint to get increased strength and durability.
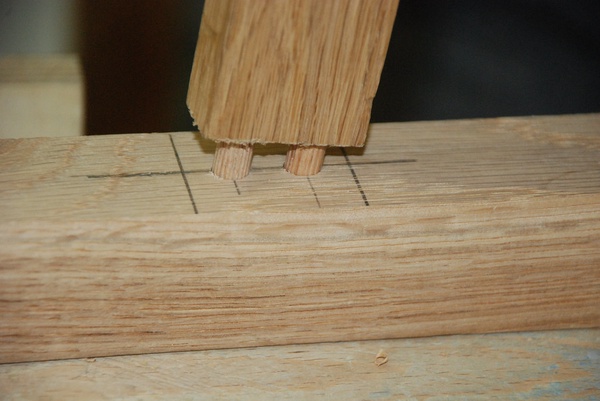
#2 Dowel Joint
A variation of the butt joint is to create a dowel joint. A nice thing about this one is when complete there are no nails or screws visible. Use this joint when making drawers to have a clean looking drawer side when finished.
Required tools:
- Saw
- Drill and/or drill press
- Dowels
- Mallet
- Wood glue
A downside to a dowel joint is its dependent on the strength of the dowels. If the joint location is under a lot of stress the dowels or surrounding material can break.

How to create a dowel joint
- Hold the two pieces up to each other. Draw a line with a pencil on each piece where the dowels will go.
- Measure the thickness of the boards and divide by two. Draw a line at this measurement where the dowels will be. Cross that line at the locations you drew on the outside where the dowels should go.
- Drill a smaller pilot hole at this mark. It’s important that the holes are drilled perfectly straight. The boards will not line up right if the dowels are crooked.
- Drill a hole the same thickness and depth of the dowel. To get the correct depth drill half the length of the dowel in each board. I like to put a piece of masking tape on my drill bit at the correct depth.
- Coat the dowels with glue before tapping them into the holes. Fit both boards together and clamp it for the glue to dry.
A drill press can be used in some situations, but if you don’t have one a hand drill will work fine.
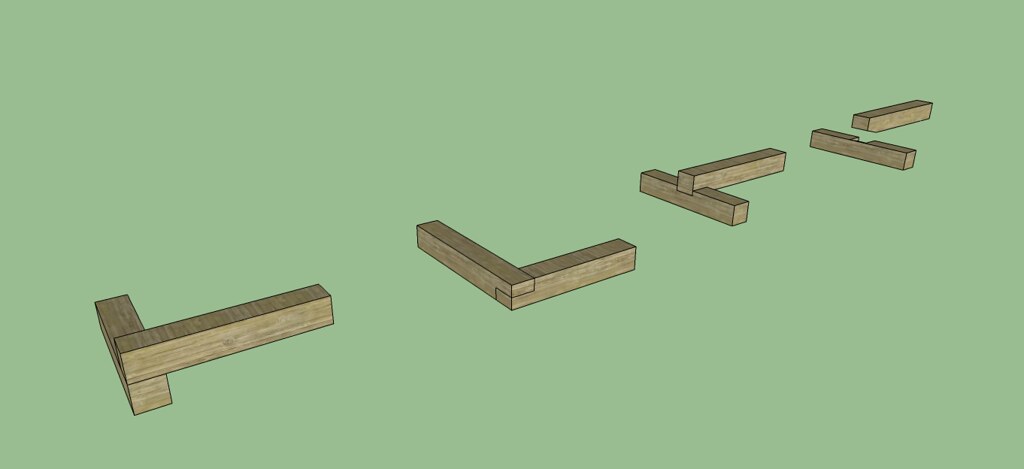
#3 Dado Joint
The dado wood joint is commonly used with cabinet making. This is a joint that is like the butt joint, only it has a groove that was cut in the side of one of the pieces. This makes the joint stronger than a butt joint.
It’s common to apply wood glue in the groove. This gives it added strength. If the edge is not a finished edge it’s common to install screws, giving it an added level of strength.
Required tools:
- Router or table saw
- Straight edge and clamps
- Screws
- Wood glue

How to create a dado joint with a table saw
- Place the end of one piece on the side of the other where you want the joint to be.
- Draw a line along each side of the perpendicular piece.
- Measure the thickness of the piece you marked on, and find half of it.
- Set your table saw blade to this depth.
- If your saw allows you to stack blades, stack them to the thickness of the perpendicular piece.
- Set your fence to guide the piece where the groove is at.
- Run the piece through the table saw, creating a dado.
How to create a dado joint with a router (if you have a router table follow the above steps; use a straight bit the same thickness of the piece of wood)
- Follow steps 1-3 above.
- Set the depth of your straight router bit to half the thickness of the material you are cutting.
- Measure from edge of bit to edge of router base.
- Clamp a straight edge to the board at the above distance from line.
- Run the router while holding the base against the straight edge, forming a dado where you want it.
#4 Miter Joint
A miter joint is formed with both pieces cut at half the angle of the desired angle. An example would be if you want to form a 90 degree angle cut each piece at 45 degrees.
This joint is commonly used when making picture frames.
Required tools:
- Miter saw
- Or hand saw with miter box
- Clamps
- Screws
- Wood glue

How to make a miter joint using a miter saw
- If you want to make a 90 deg angle set your miter saw to 45 deg to the left.
- Cut the piece that will be to the left when you are looking at both pieces.
- Set the miter saw to 45 deg to the right.
- Cut the right piece at this angle.
- Spread glue across both cut surfaces that will make contact.
- Clamp to dry.
- Screw or nail the back at an angle for added strength.
Miter joints are one of the most common joints in woodworking. When done right they can look beautiful and virtually seamless. There are many applications beyond picture frames for using this joint.
#5 Lap joint
The lap joint has many variations of it. Like many woodworking joints, the lap joint is limited to the creativity of the woodworker. It’s also a joint that can be used for many applications.
The basic concept of a lap joint is one board overlapping another one. There are several ways you can make this, some will be more simple than others. There are also several ways to fasten them together.
Since there are so many styles of lap joints, I am not going to explain how to make them. The required tools are going to be a saw, either hand saw or table/ miter saw.
Once the pieces are cut in the correct manner they must be fastened together. This can be done by simply gluing them and clamping them together. Or you can use any variety of screws or nails to get the job done.
Complex Wood Joints
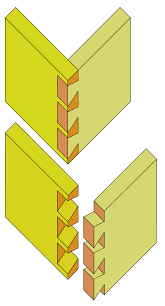
#6 Through Dovetail Joint
When you are interested in making your projects look like a piece of art, you may want to consider using a dovetail joint. This method is used to join two pieces of wood together at a 90 deg angle.
One of the most common applications is in the corner of drawers. The two pieces lock together, making the drawer very strong, without the use of nails or screws.
Required tools to cut by hand:
- Dovetail jig
- Marking gauge
- Marking knife
- Pull saw
- Coping saw
- Chisel set
- Random orbital sander
- Wood glue
How To Make A Dovetail Joint By Hand
Required tools to cut with router:
- Router table
- Tail router bit
- Pin router bit
- Keller jig
How To Make A Dovetail Joint With Router Table
#7 Mortise and Tenon Joint
A mortise and tenon joint is essentially a cavity, or mortise in one timber that houses a protrusion, or tenon from another. This is arguably one of the strongest joints in woodworking, along with dovetails.
What makes them strong is there is a lot of surface area from the two pieces making contact. This combined with creating them to fit tightly creates a very strong and durable joint.
The mortise and tenon joint has a lot of variations to it. Some are designed to have the tenon fit all the way through the mortise hole. Others only go partially through, concealing the end of the tenon inside.

Different styles can be brought into the craftsmanship of these joints. This part is limited to the woodworker’s imagination. They can either be glued together, or being locked into place.
Required tools:
- Saw
- Drill
- Chisel set
- Wood glue
#8 Box Joint
The box joint is similar to a dovetail joint. The difference is this joint has a square shape on each of the fingers.
This is another strong joint to use. It is used for joining two pieces together that are at a 90 degree angle. Use this joint for short pieces like drawers or small boxes. It won’t be easy to make on longer pieces.
Required tools
- Table saw
- hand saw
- Coping saw
- Wood glue
- Clamps

How To Make Wood Joints By Hand
Many of the woodworking joints mentioned above can be made by hand. Some are going to be easier to create than others. The same basic tools will be used for most of them. Those are pull saws and coping saws, a chisel set, and a tape measure and pencil.
For certain joints that are more complex, like the dovetail, I recommend using a jig. This will let you be able to replicate it exactly each time.
Handmade Joints:
- Butt joint
- Dado joint
- Miter joint
- Box joint
- Dovetail joint
The box joint and dovetail joints are more complex. They are going to require more tools, and are not as beginner-friendly.
Conclusion
There are many types of woodworking joints to choose from. Some of these can be combined with others, making a unique and creative option. Learning how to make different types of woodworking joints can be a fun process that will help you grow in this hobby.
I hope you got a lot of good information out of this article. Please feel free to leave a comment below if you have any questions, or something else you would like to mention!
Happy Woodworking,
Kevin
You cover more helpful info than I have seen elsewhere. Please could you share your sourceexperience with me? Eleanor Ichabod Shevlo
Hi Elanor,
I got my experience from years of woodworking since I grew up in a family of woodworkers. I also like learning about the subject.
Do you mind if I quote a couple of your articles as long as I provide credit and sources back to your webpage? My blog is in the exact same area of interest as yours and my visitors would definitely benefit from a lot of the information you provide here. Please let me know if this okay with you. Regards! Tim Chalmers Joiner
That would be an honor. I am glad I could provide some value to you and your audience! Thank you for checking with me first.
Hi Tim,
That would be fine for you to quote any of my articles. I am glad to provide valuable information to you and your audience. Thank you for asking. You don’t need to ask me to do this in the future.
-Kevin