
Getting Started In Woodworking
When thinking about getting started with woodworking it feels overwhelming to many of us. This doesn’t need to be the case because woodworking can be broken down into more manageable components.
This article is a comprehensive look at all aspects of woodworking. Here you will learn about what tools to choose as a beginner, some of the more common types of woodworking joints, and where to find a complete list of woodworking plans.
The Key Components to Getting Started In Woodworking:
- A woodshop to work in
- The right tools for beginners
- The required materials
- A plan of what you’re making
- Time
- Patience
Woodworking is a hobby enjoyed by thousands of people around the world. There is a huge assortment of woodworking projects for people of every skill level to create.
A Woodshop to Work In
Having an area to work in is an extremely important part of woodworking. This doesn’t mean it needs to be a designated space stocked with all the latest and most expensive tools. It doesn’t need to be extremely large at that matter.
It’s totally possible to complete some great projects without having a woodshop. It is a lot more common than you might think. Contractors are able to make some very detailed things without having a workshop to do it in.
That said, there are a lot of benefits to having a woodshop to work in. The most important one is having all the tools you need close by when you need them. There are other factors that should be met. Get an in depth look in my article on Woodshop Layout. Let’s look at some basic points on setting up a new woodshop.
A Woodshop For Beginners
When first getting started in woodworking it’s not necessary to spend a boatload of money on all the best equipment. You don’t need to rent a space so you have a comfortable place to work in with all your new tools. You don’t even need to have a spot that’s designated solely for woodworking.
That said, there are a few factors to consider before making any major decisions for your woodshop.
The first thing to consider is do you have a solid platform to work on. Two sawhorses with a sheet of plywood laid across them may be all that you need.
You want the platform to be stable enough to use a miter saw, or other power tools on without it falling over. I have done a lot of cutting outside in my driveway with my miter saw on two sawhorses, and a table saw nearby.
This is not possible when there is foul weather and you are exposed to the elements. Rain and wood are not the best of friends.
Another downside to this option is when you are done with your work and it’s time to put everything away. It’s a lot more convenient to have a workbench that the tools can stay on when not in use.
Some people have small apartments and they need to do their projects on the kitchen table. This is a creative solution to take, but it can be annoying cleaning up all the sawdust before you need to prepare your next meal.
A workbench can be as simple as an old repurposed table, or it can be as elaborate as a bench built with different surface heights for your miter saw or table saw deck to be flush with the bench top.
There should be adequate lighting above you. This will reduce marking errors because you can’t read the tape well enough. It also is important so you can see the line while you’re cutting.
Depending on the type of woodworking you are performing you are going to need access to electrical outlets and extension cords. Some people do their woodworking solely with hand tools. In that case access to outlets is not as important.
There are many creative solutions for a beginner to set up a workshop. This is going to evolve over time. It is not critical that you have an elaborate shop right up front.
Set up a location that you can get started in, and practice the hobby before fully committing. If woodworking is a good fit, the woodshop will eventually improve.
Another thing that will evolve in this hobby are the tools you are working with. Let’s take a look at what I mean.
The Right Tools For Getting Started In Woodworking
Having the right tools for woodworking can be the difference between enjoying your time working on a project, and ruining it or possibly getting injured. It’s very important to have tools that perform well.
It’s not necessary to buy any specialty tools at this point. These rarely get used, which makes them a waste of money and an extra space filler when you haven’t decided what type of woodworking you want to do yet.
When just starting out it’s good to have a few basic tools in your arsenal. It’s important to get tools that perform well for what you are doing.
This doesn’t mean you need to break your bank and buy all brand new tools on day one. There are some ways to get affordable tools that won’t destroy your budget. We will talk about these options later in the article.
It can be difficult to know what woodworking tools you should get. When starting out with this hobby you will soon realize there is a lot of choices out there. For that reason you want to visit my post on The Best Woodworking Tools For Beginners.
Let’s take a look at the basic beginners list of tools to start with. This is enough to get you started in most of the basic projects, but you might need to add to them as your skills improve and you want to make new things.
What Woodworking Tools Are Good for Beginners:
- Tape measure/ pencil
- Hammer and rubber mallet
- Bar clamps (“F” clamps)
- Power drill
- Circular saw
- Router with at least two bits
- Jigsaw
- Set of chisels
- Combination square
- Extension cords
This is a basic list that doesn’t include specialty tools. The items will be enough to get you started with woodworking. It doesn’t include items like screws, nails, and wood glue. These will be covered later in this article in the section called basic joinery.
The above list are tools that can be used in the place of more expensive options. One thing to consider about woodworking is oftentimes there isn’t one way to get a task done. There can be more than one tool to get the same result.
When looking for tools, it’s not always necessary to go to the local hardware store to buy them brand new.
This option can be a lot more expensive, which is not ideal when just starting out. At this point you haven’t experienced woodworking enough to tell if you want to do it long term. And for that reason I have some suggestions on where to find affordable second-hand woodworking tools.
Best Places To Buy Used Woodworking Tools
- Craigslist
- eBay
- Garage sales / estate sales
- Rent them from hardware store rental center
Renting the tools is not exactly the same as buying them. But this can be a good way to find the right tool for your needs. It can be an option to try out new brands or even different versions of a tool.
When shopping for woodworking tools as a beginner there are a few things to keep in mind. It’s best to have a tool that’s going to perform well for a long time.
Since woodworking tools are generally built to be durable, it’s perfectly fine to purchase used items as long as they’re still in good working condition.
Sharpening Woodworking Tools
As tools get used it’s normal for them to get dull, and even damaged on their edges. Keeping woodworking tools sharp is an important part for any project.
It doesn’t need to seem difficult to sharpen your tools, depending on how dull and/or damaged they really are. This type of regular maintenance will prolong the life of the tool, and reduce the risk of damage to your materials or injury to yourself.
Dull woodworking tools can be dangerous to use, making it crucial that we periodically observe the amount of wear they are showing. Certain hand tools with sharp edges like chisels and hand planers can be sharpened which helps optimize their performance for a longer period of time.
If tools like chisels are not dinged up too much it can be quick and easy to give them a quick sharpening. There are several ways to do this.
Sharpening Tools By Hand
The quickest way is to clamp the chisel in a vise and use a metal file on it. It’s best to put it in a vise because you want the tool to be held still while you sharpen it. If you don’t have a vise you should be able to clamp it to your workbench instead.
When the tool is in the vise make sure to hold the metal file at the same angle as the chisel. Give it about five to ten passes with the coarse side and then switch to the fine side of the chisel. Repeat the amount of passes with this side.
Remember to sharpen the flat side of the chisel as well. This can be a bit difficult with the clamp and metal file technique, so I like to use a different method for this.
Get a ¼” plate of glass and some spray adhesive. Glue some 150 grit sandpaper to the glass. This will ensure the sandpaper is perfectly flat. When you have this near the edge of your workbench you want to hold the back side of the chisel flat on the paper and slide it across in a diagonal direction.
Do this a few times and take a look at it. You want to see if there are any low spots that don’t have any scratch marks on them. This means the chisel has dings in it and it isn’t perfectly flat. Keep going with the 150 grit paper until the entire backside of the chisel is scratched by the paper.
Next you can switch to some 220 grit sandpaper and repeat the process. This will help get the edge of the chisel perfectly sharp.
This process can be repeated with any edge type of tool. Chisels and planers are the two most common types of hand tools that will need to be sharpened.
Sharpen Tools With A Power Tool
If you have access to a grinding wheel it is going to make it much easier and save you a lot of time when sharpening your tools. It’s okay if you don’t have a grinding wheel because there are other ways that work well also.
Replace Your Blades
Power tools like circular saws and router bits won’t be sharpened by you. The blades are generally recycled and a new one is replaced.
I have a video on how to change a miter saw blade. Click here to check it.
Woodworking tools can be thought of as being the means to making parts of a puzzle out of wood. When constructing any wood project it can help to think of it as creating pieces of a puzzle from scratch.
Once the pieces are made for your project they need to be fitted together. Let’s talk about the process of attaching the pieces together, also known as joinery.
Basic Woodworking Joinery
When I am building something, whether it be a toy or a shed, I like to consider it a puzzle that I need to make the pieces for. Putting those pieces together is one of the most important steps to complete it.
There are many ways to join wood and other materials together. Some are much more difficult and intricate than others. Generally speaking the more difficult a joint is to create and fit together, the stronger it will be to hold.
There are also a lot of tools and larger pieces of equipment that can be used to make the components of various woodworking joints.
Some tools are more general use that can be used for many applications, like a hand saw. Other tools are specifically designed for the one task of joining pieces in a specific way like a biscuit joiner.
Lets cover some of the more basic types of joints in woodworking. Understand this is not a complete list. There are countless types of joints you can use. The more of them you learn, the more options you have to make beautiful projects out of wood.
Types of woodworking joints
There are a huge selection of types of joints the woodworker uses. For simplicity purposes I will only be able to cover a handful of them in this document. The main thing I want you to remember is a woodworking joint is used to join two pieces you are working with together.
Gluing Wood Together
The simplest of the joints is to glue two pieces of wood together. To do this we use specifically designed wood glue. You will want to have the wood grain running in the same direction if possible. This will create the strongest joint.
Make sure the two edges that will be glued are clean, and the wood is smooth. If they have burrs or shavings on them there won’t be a tight bond. It runs the risk of breaking the bond after stresses are put on it.
You can clean the edges by lightly running sandpaper on it. Apply the glue to both edges, fully coating the pieces that will be in contact. If there is a finished edge that will be visible, I recommend putting painters tape on it to keep it clean of any glue that might drip out.
After they are glued up and put together use a couple of clamps to hold it together. Tighten the clamps and wipe excess glue off.
The clamps will need to stay on for at least 12 hours but possibly up to 24. This can depend on the temperature of your workshop, and also how much glue/ the size of the pieces being used.

This is a good method for many applications. But it’s best if
Gluing two pieces together is the easiest method of joining wood together, but also the weakest. Another method of
Nailing/Screwing Wood Together
The next most simple form of joining pieces together is using nails (or screws). Nails are easy to use, but they are highly visible on the finished product. Glue the boards up first before you nail them to take your joint to the next level.
Another problem with using nails is damaging the material while using them. It’s easy to miss the head and ding your material, causing a noticeable blemish in your wood.
One of the more common nails we use are finish nails. These have small heads that sink into the wood, making it easy to put a bit of wood putty on it and hide them completely.
There are two ways to use finish nails. The easier way that also has less damage on the material is to use a nail gun. This requires an air compressor, and all the attachments. A finish nailer is ideal when installing moulding or finished boards on things like cabinets or other furniture.
The second way we can use finished nails is with a hammer. I mean this seems pretty obvious, but I need to mention it. When installing a few nails, and you have good aim with your hammer, then this method is much better than setting up your compressor for a few nails.
The problem with hammering finish nails in is they are easy to bend, and the head is small making it easy to miss one. A bent finish nail can also be tricky to straighten out to continue driving it in.
I recommend using glue whenever you nail boards together. This will strengthen the joint by helping the glue dry flush with the nails holding it in place.
Put a nail about every 10 inches or so, but if the joint is shorter try to use two nails, one at each side. This will keep the joint from twisting and breaking the glue joint.
Half Lap Joints
Next are half lap or half cornered joints. These are joints that fit together flush when done right. The objective is to remove half of the material from each piece, so when they are fitted together they sit flush.

This joint takes more time and effort. The two pieces need to be the same thickness, allowing both sides to seat flush with each other.
The tools needed for this joint are as simple as a pencil and a handsaw. Chisels are also a good option for a hand tool to use when making these joints. They can be made a lot quicker and more accurate with a table saw.
When making a half lap joint by hand overlap one piece on top of the other. A clamp can be used for this if necessary. With a pencil make a mark on each of the boards where the edges lay. This will be the furthest you want to cut, so don’t chisel away your pencil marks.
This joint can be tricky when the pieces need to come together at an angle. This will be when you want to consider it more like a puzzle you are making the pieces for. The more accurate you are at this point, the tighter the pieces will fit.
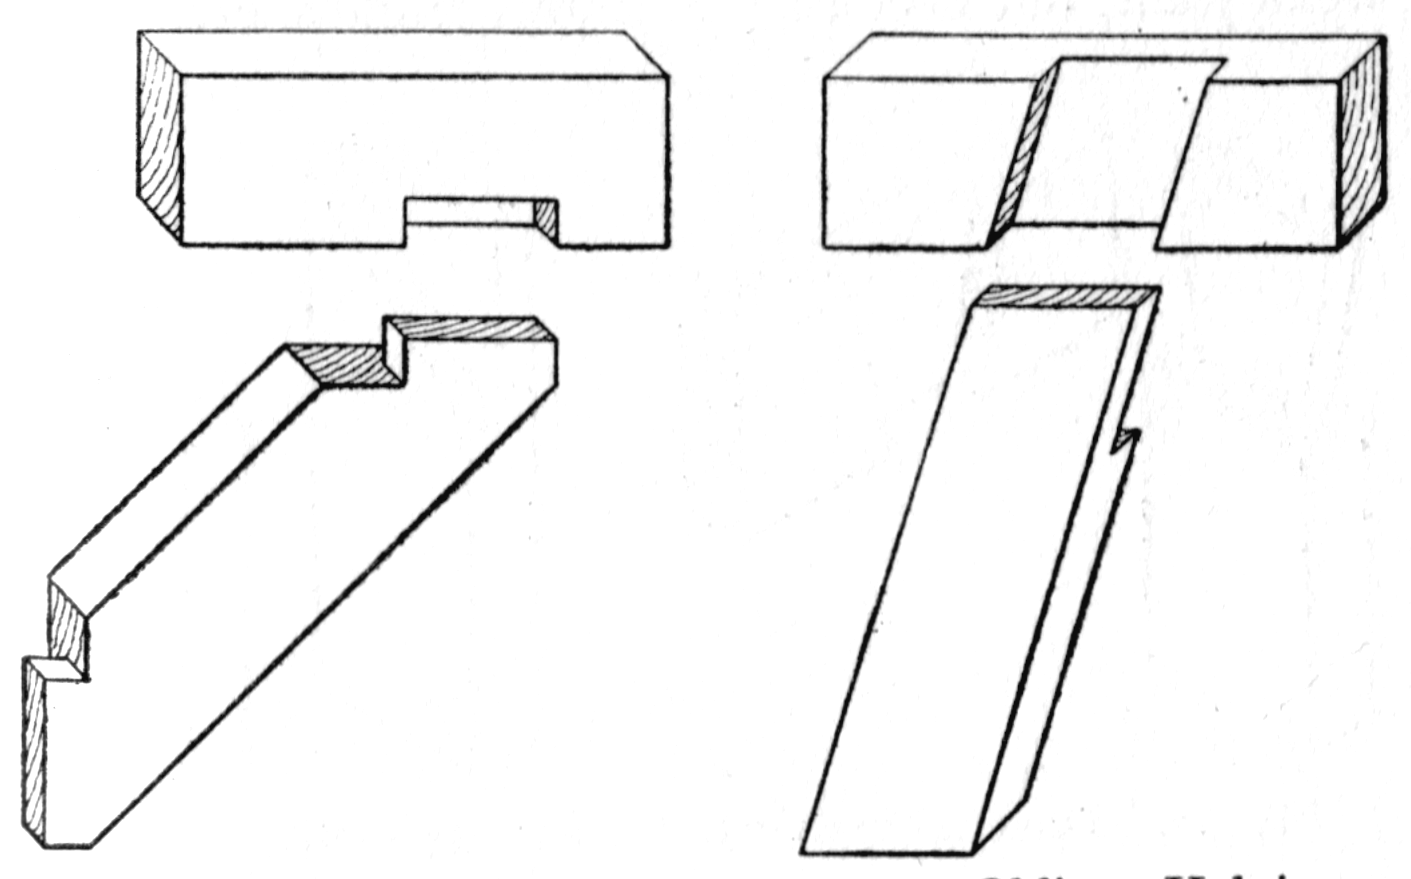
If they are close to fitting but don’t fit yet you want to use some coarse sandpaper. But sandpaper is better when going with the grain so be careful if you need to sand perpendicular to the grain. This might make a piece chip off that needs to be glued back on.
Dovetail Joint
I wouldn’t be able to talk about joints without mentioning dovetail joints. These are beautiful when done right. I just love the way a good dovetail looks.

These won’t need any nails, but you do want to glue them up. They take a bit more time to master, but when you do you will be very proud of what you have accomplished. I love the way a clean dovetail joint looks, especially when contrasting wood colors are used.
Dovetails are my favorite woodworking joint because of the style and craftsmanship that goes into making them. When done right they are a work of art that puts the woodworker into the artist category.
Finishing Your Woodworking Project
The final step to woodworking is finishing your project. This may sound obvious, but what finishing really means is to apply a wood finish to it. For the sake of this article I will not be able to go into too much depth on how to choose the correct finish for a particular project.
Types of wood finishes are going to be:
- Oil finishes
- Wax finishes
- Paint
- Stains of various colors
These are a few options that look nice when you’re done with your woodworking project. There are several reasons why we want to apply a finish to our project. The first reason is because it looks nice. There is a nice aesthetic to a well finished woodworking project.
The second, and most important reason why we want to apply a finish is they help the wood last longer. The correct type of finish will help repel water, and prevent the material from deteriorating.
FAQs for Getting Started In Woodworking
What tools do you need to start a woodworking shop?
When setting up a woodshop there are many combinations of tools to get started with. A lot of it depends on what your budget is, as well as what you want to build. Some of the staple tools for a woodshop are:
- Miter Saw
- Circular saw
- Clamps
- Chisels
- Drill
- Rubber mallet/ hammer
I have an article that goes much more in depth on the tools needed to start a woodshop. It’s called Top 10 Tools to Start a Woodshop for Under $1000. You can read it by Clicking Here!
How do I get started woodworking in a small space?
It’s quite possible to set up a perfectly functional woodshop in a small space. Some people even do their woodworking in a space that is predominantly used for a different purpose. I touched on this point earlier, but a great resource to get much more valuable information can be seen by clicking here
Is woodworking hard to learn?
The short answer is both yes and no. It can be a challenging hobby when just starting out. But after you gain confidence you will get much more comfortable with taking smart risks.
Woodworking is the ability to use different types of tools in concert to make something creative and beautiful. It is a hobby that requires focus and patience. Take your time when just starting out with learning the fundamentals.
Always practice safety when woodworking. There are some important safety equipment that every woodshop needs to have. Safety goggles, gloves, and ear protection are the three main ones that will be used most often. Every shop should have a fire extinguisher that hopefully never gets used.
What is a good first woodworking project?
There are lots of good projects to make out of wood. It’s important to get the fundamentals of joining pieces together in different ways.
I recommend making a basic box with a removable lid. This will help you understand how to cut your pieces to fit flush when they are put together. There are a lot of fundamentals that go into making a box.
It is nice to have something nice when you finish a product. But what’s more important is you learn fundamentals on the different methods of joining wood and cutting to the right lengths. From there you can practice more elaborate joints like dovetails.
It’s a good idea to get some pieces of scrap material and practice different methods of doing this. Teach yourself the fundamentals first to make woodworking a more fun and enjoyable experience!
Beginner woodworking projects
When beginning with woodworking it can be difficult to think of things to make that don’t require elaborate and expensive tools. Some projects don’t require as much skill as others, making them great options for beginners.
A few choices for beginner woodworking projects are:
- Serving tray
- Cutting board
- Garden table
- Address number frame
- Cabinet
- Wine rack
- Bird house
This article has helped you learn the basics in getting started in woodworking. This is just a starting point for you. Now it is time to take this knowledge and grow in woodworking.
I know how rewarding it is to create something nice in this hobby. I hope I was able to give you the knowledge you need to get started.
Thanks for reading.
-Kevin