
Learning how to use a table saw can be a very daunting task if you don’t go about it the right way. There are some important details that need to be covered before firing up your table saw for the first time. I will also tell you a personal story of an injury I have caused by a table saw.
The table saw is one of the most important tools in a woodshop. They have a huge number of uses, and when utilized they will make your projects much more enjoyable. Before you can feel comfortable making all the right cuts, you should look at a few important details about using a table saw.
Table saw basics

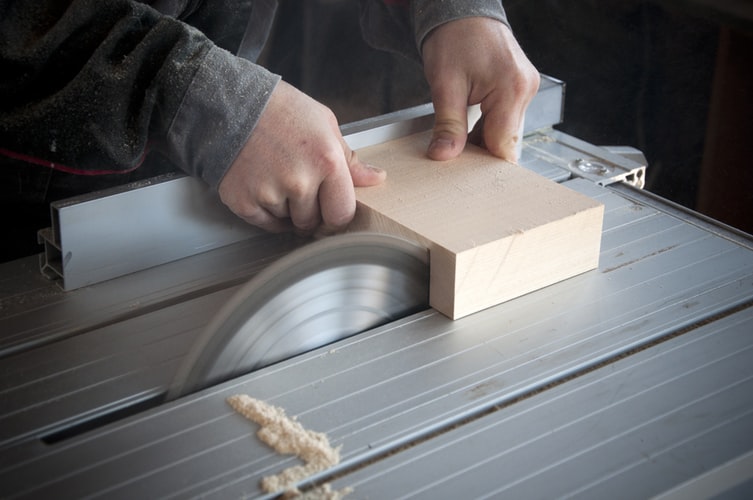
A table saw has a circular saw blade that pokes up through a flat metal surface. They are used to cut pieces of lumber no thicker than 1-2 inches. The material will lay on the surface of the table. It then slides across the blade.
The blade height adjustment wheel moves the blade higher or lower accordingly. There is also a blade angle adjustment wheel. This is a lot like the height adjustment wheel, but it adjusts the pitch of the blade to make angled cuts.
The fence is guides the material to slide along, creating a straight cut. The fence has a lock on it called a fence dog. This helps lock the lever where needed, depending on the size you want the material to be after you cut it.
Finally, there is an on/off switch that is in easy access. They generally will allow you to quickly kill the power in case of an emergency.
Table saw safety

When using a table saw, safety is paramount. This is an extremely dangerous tool when not used correctly. Years ago, I made the mistake of reaching across the blade with my left hand to pick up a small piece I had just cut, when my thumb hit the blade. It left me with a scar on my thumb as a reminder of how lucky I still have all my fingers!
DISCLAIMER: Do not use any gloves while working with power saws because there is a chance they can get caught on the blade. This can cause more damage than if you didn’t have them on while working. The injury to my left hand would have been much more drastic if I was wearing gloves that day!
The personal protective equipment are items we use to protect our eyes, ears, and lungs. A good pair of safety goggles is something I am always using in the workshop, no matter what the tool is I am using.
Simple earplugs can be enough for working with a table saw, but you might want to consider ear muffs because they ensure better protection, and I think they are more comfortable.
A simple dust mask will protect your lungs from particulates in the air.
How to Use a Table Saw to Cut Plywood
Preparing to make your cut is the most important part to get right. Take your time doing the prep work so you don’t waste any material by cutting the wrong location. This goes back to the adage of “measure twice, cut once.”
Once the cut is complete there is no changing it. If you cut it too big there will still be enough material to take more off. If it gets cut too small you are not able to put more back on. These are the mistakes we aim to avoid.
There is a simple process with easy steps to follow for cutting material on a table saw.
Step 1: Calculate the measurement of your piece.
The sizes of the pieces being cut should be determined before beginning. Take the thickness of the sides, and subtract that from the overall size. Repeat the process for the height, etc.
It’s helpful to be working on a project that already has a set of plans to go with. I especially like this because someone already took the time to make all the calculations. All that’s needed is to cut the pieces to the dimensions listed on the plans, like measuring out ingredients of food to make a recipe for dinner.
Step 2: Set the blade to the right height and position.
Setting up the blade is very important because if it isn’t at the right position when you make the cut, your material either won’t be the right shape, or it might not be cut all the way through.
Adjust the blade to be a quarter to a half inch above the thickness of the material. To do this put a piece of the material being cut on your flat on the table saw and butt it against the blade. Turn the adjustment wheel until the blade is at the correct height.
At the same time, also make sure the pitch of the blade is at 90 degree (unless you want to make an angled cut, then verify it is at the angle you want).
Step 3: Set the fence to the desired width.
You may need to make sure the table saw fence is parallel to the blade. If it isn’t it will cut at an angle, or it may bind the piece of wood, making it dangerous to cut.
To do this you will want to put a straight piece of material against the blade on the left side. When the fence is at the width you want your cut to be on the right side of the blade use your tape measure to measure between the fence and the board at the far end of the fence as well as the near end of it. If these measurements are the same you know the fence is parallel to the blade.
When checking if the width is correct for your cut this way you need to consider the thickness of the blade. When you measure, you want to subtract 1/8 inch from the overall width because that’s how thick the cut will be.
Step 4: Make the cut
Hold the material partially on the table surface, but without it touching the blade. Ensure that the material is flat against the fence. Once it’s on the fence you can turn the table saw on.
While holding your hands away from the path of the blade you can start feeding the material through. While doing this I like to keep my eyes on the fence pretty much the whole time. Make sure the material stays on the fence, but also periodically glance back at the blade, especially as your hands get closer to it. You don’t want to accidentally run your hand into the blade.
After you pass the material all the way through you can turn the saw off. I usually will allow my material fall to the ground unless it’s something that can easily be damaged. Be sure to keep your hands away from the blade always.
Step 5: The cleanup process
Cleanup is just as important to your project as setting it up. It’s a good practice to make sure there isn’t a mess to deal with later. This can be quick and easy when you have the right tools.
Shop vacuums are recommended for any wood shop. There is a lot of debris created from a table saw, and the shop vac can deal with it quickly. Certain table saws have a spot to connect shop vacs.
Power cords on the floor are a trip hazard. Have a spot in your shop for the power cord storage. This makes it easy to have them out of the way, and where you know they are at when you need one.
What is a Rip Cut?

Rip cuts are when the wood is cut in the same direction as the grain. This is done on a table saw, but can be done with other types of saws also.
These cuts are generally smoother, because the saw blade is working with the grain. You are less likely to get small wood fibers on the edge of the material. some blades are specifically designed for making rip cuts, but some blades are hybrids that can both rip cut as well as cross cut.
What is a cross cut?
A cross cut is when you cut the wood against the grain. This happens when the material’s grain is either perpendicular or angular to the blade.
This is not realistic for home woodworkers to have a designated saw for both types of cuts. That’s why most wood blades have both types of teeth. This is important to make the two cuts. You can use these blades without worrying which type of cut you are making.
How to Rip Cut an Angle on a Table Saw
Cutting an angle in a piece of material is different than making a straight cut. There is more than one way to do this. Several miter saw accessories are on the market that help with making angle cuts on a table saw.
I do not recommend trying to freehand the cut. This is highly dangerous, and there are safer and easier ways to do this. Several types of “miter gauges” are available on the market.
Some miter gages are designed to slide in the dado on the table saw. This lets you hold the piece of wood at the appropriate angle to the saw blade. This tool is especially nice when using it to cut angles on larger pieces of plywood.
A taper guide rests against the table saw fence. An angle is made that rests against the board to slide along the fence. This tool can only cut pieces that are small enough to fit between the fence and the blade. The fence only goes so far so if you want to cut a piece that is larger than this distance you would want to use a miter gauge.
Another awesome miter saw accessory is made by the company Rockler, and is called a Taper Jig. This tool is simple to use and helps you safely cut an angle on a piece of wood on a table saw. It’s rides in the dado groove on the saw surface. The jig is limited to cutting certain size pieces.
Table saws are very important tools for a wood shop. They are great at making the project quicker and the pieces more accurate sizes. When used properly they are very safe, but can be very dangerous to us as well.
After you consider the different elements in using table saws, you can be more comfortable with using them.
Happy woodworking,
Kevin