
It seems confusing when you don’t know how to adjust hinges on cabinets. You don’t need to pay an expensive handyman to get your cabinet doors back into alignment. Adjustable hinges on your cabinets only need one tool that you already have at home. Now let’s take a closer look at how easy it is to adjust the hinges on cabinets.
There are three screws that are used to adjust your cabinet doors. To make the adjustments all you need is a phillips screwdriver. Using small turns and checking your progress often is going to work the best. Once one door is done, move to the next door as you work down the bank of cabinets.
This article is meant for cabinet hinges with adjustment screws. It does not apply to cabinets that have face mount hinges.
The screws shown in these diagrams are used with european style cabinets. If your cabinet has adjustable face-frame hinges, the adjustment screws will be in a different location.
The most common time the doors need adjustment is when the cabinets are first installed. If you are installing new cabinets, Click Here to take a look at my post that covers everything you need to know about cabinet installation.
The other time cabinet hinges will need adjustment is after they begin to shift. As cabinet doors are used over time, the screws can tend to turn on their own. The more this happens, the more the doors will sag and shift, until they ultimately start hitting one another.
Required Tools:

Each of the three adjustment screws move the cabinet door in different directions. There are at least two hinges on each door, but taller doors may have three hinges. Each hinge on the door should be adjusted at the same time. We will be looking in detail at the best process for making hinge adjustments, but first it’s important to get a better understanding of what the screws do to the position of the door when turned.
Cabinet Hinge Adjustment Diagram
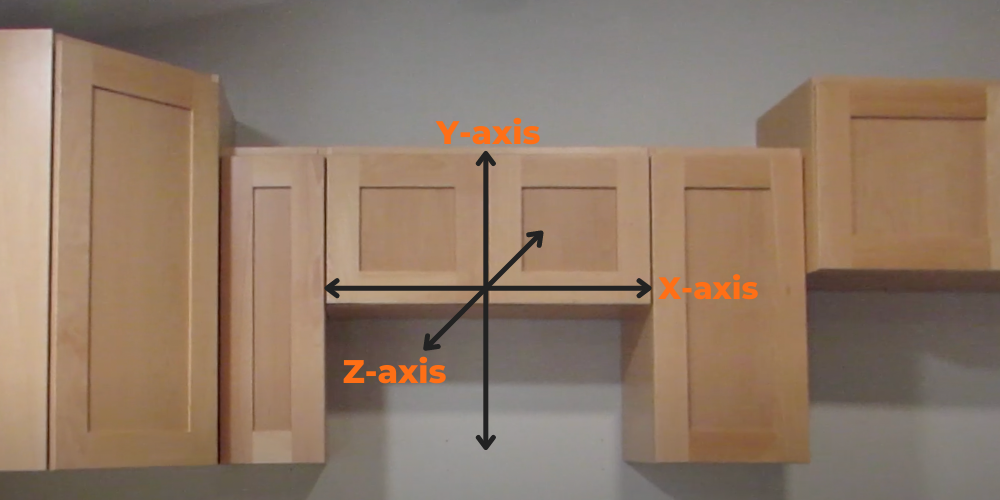
Each screw controls a slight amount of movement on the door in different directions. When looking at the door while closed, there are three directions it can move in. Let’s call the “X-axis” the left and right direction. The “Y-axis” will be up and down, and the “Z-axis” is towards you and away from you, as shown below.

Kitchen Cabinet Hinge Adjustment Screws
In order to know how to adjust hinges on cabinets, you first need to identify the adjustment screws. These screws are not used to attach the hinges to the cabinets or doors. Instead they control the movement of the doors when adjusted.
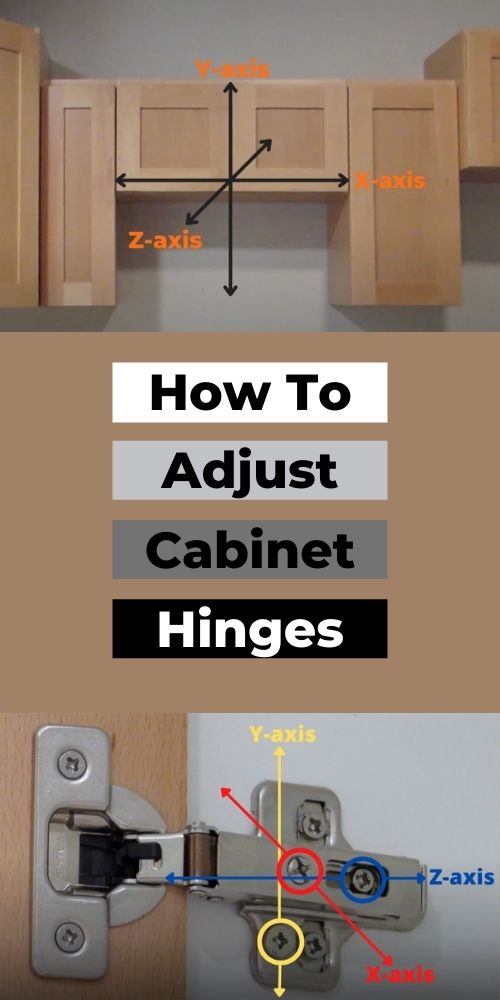
Now that we understand the directions the doors can move in when adjusting them, let’s take a look at the three screws that make these adjustments. Below is a diagram of the locations of the screws you will be using on an adjustable cabinet hinge.

The screws can only be turned roughly half a turn in each direction. The direction the door moves in will depend on if the screw is turned either clockwise or counter clockwise. Each door will not need to be moved very much because you will be able to adjust the neighboring doors as well.
When each of the doors are adjusted, the bank of cabinets will be able to have a consistent look. Adjust one door at a time, but pay attention to the next door as you are working.
How to Fix a Gap Between Cabinet Doors
One of the main goals of knowing how to adjust hinges on cabinets is being able to fix the gap between the cabinet doors. The main goal is to get the door edges to line up as close as possible. It’s also important to try to make the size of the gap between the doors as consistent as possible all the way around.
The only tool you need for this is a phillips screwdriver. I like to have a good multipurpose screwdriver set because it is a lot more versatile, giving you multiple tips to use with the same tool.
Almost all the adjustable hinges will take a #2 Phillips head, but some are easier when using a flat tip instead. It’s good to have both options handy for adjusting your cabinet hinges.
ATTENTION: Don’t use an electric drill when adjusting your cabinet hinges. The adjustments should be made using small turns. An electric drill has more power than needed, making it difficult to make small turns. You may run the risk of locking the screw, or stripping the head.
If you are working with newly installed cabinets, start by putting all the doors on before making any adjustments. With all the doors shut, begin with the cabinet doors on one of the ends of the bank of cabinets.
The corners closest to each other on the first two doors will most likely not be lined up well. The goal is to get all the cabinet doors to be lined up straight across, and parallel to the top or bottom edge of the cabinets. Also you will want to have the gap a similar width around each door. This will take many small adjustments as you work down the row.
Open the door you want to make the adjustment on, and turn one of the adjustment screws. Close the door to tell if that was the correct screw and direction. If not, open it and turn it the other way to correct it.
As you turn the different screws, you will get used to what direction the doors are moving in. It will become natural for you to know what screw to turn as you are working.
As I go I like to run my finger along the top or bottom corners of the doors. This helps me tell how close they are, and what direction they may need adjustment.
This process will take several small adjustments on each door, possibly working with more than one adjustment screws. You will notice the cabinet doors start to line up straight.
How to Adjust Corner Cabinet Hinges

Two-door corner cabinet hinges also have adjustment screws. All four hinges on the cabinet have screws to adjust the doors in the three directions discussed above.
If you want to know how to adjust hinges on corner cabinets, start by locating the adjustment screws. These are not the screws used to install the hinges to either the cabinet or the doors. You may need to try turning the screws to tell which direction they move the doors in.
Use the process described above to make adjustments on the doors. It may take a bit longer because there are more hinges for these cabinets, but take your time. These hinges work in much the same way as the other cabinet doors do.
The main thing to remember when learning how to adjust hinges on cabinets is it works best if you make small corrections and check how the doors look. This can take several turns per hinge. The hinges are not designed to be adjusted very far.
I hope this article helped you out. If you have any questions or comments please leave them in the comment section below.
Happy Woodworking,
Kevin